Intro
Hublify provides a very flexible and easy-to-use email-templating engine.
This does not apply only to the main email-content-body but especially to all other email-parts like subject, body-html, body-text, to, cc, bcc, from, reply-to and even attachments too!
Quick facts
With Hublify Email-Templating you can ...
- render HTML / Text emails
- create dynamic (context-sensitive) Subjects, TOs, FROMs, REPLYTOs, ...
- create / add attachments
- access all your Hublify data and even remote datasets
- easily send Emails (via: Hublify Email-Channel)
Easy and flexible
What is particularly convenient when creating e-mails in Hublify is that you only need one Twig template. Recipients, headers, footers, stylings etc. are integrated into this Twig template. Of course, you are free to store code (such as stylings) in separate files and include these files.
HTML Template Structure
Hublify has some prepared special features.
Example
Here is an example, showing the usage of some typically used special Hublify-Message-Tags.
example-mail.html.twig
{# ----  A Hublify-Email-Msg-Template example  ---- #}

<hublify-msg-email-to>info@domain.com</hublify-msg-email-to>

<hublify-msg-title>Hello, this is my subject!</hublify-msg-title>

<hublify-msg-body-html>
<html>
  <body>
      <h1>Hello Hublify!</h1>
      <p>This is the HTML-Content-Part of this email!</p>
  </body>
</html>
</hublify-msg-body-html>
Special Tags
<hublify-msg-email-to>
If present, this tag will be extracted from the finally rendered html-twig-result and usually used as the email's TO-email-address.
Skip sending e-mail: If you provide a string with a double-underscore-prefix, e.g. "__DO_NOT_SEND" instead of an email-address, then Hublify knows you (from inside the email-twig-template) do not want to send the currently rendered email. Hublify interprets this as a valid "abort" / not-send and returns status TRUE, instead of an error!
<hublify-msg-email-cc>
If present, this tag will be extracted from the finally rendered html-twig-result and usually used as the email's CC-email-address.
<hublify-msg-email-bcc>
If present, this tag will be extracted from the finally rendered html-twig-result and usually used as the email's BCC-email-address.
<hublify-msg-email-from>
If present, this tag will be extracted from the finally rendered html-twig-result and usually used as the email's From-email-address.
<hublify-msg-email-replyto>
If present, this tag will be extracted from the finally rendered html-twig-result and usually used as the email's Replyto-email-address.
<hublify-msg-title>
If present, this tag will be extracted from the finally rendered html-twig-result and usually used as the email's Subject.
<hublify-msg-body-html>
If present, this tag will be extracted from the finally rendered html-twig-result and usually used as the email's actual Content (HTML).
<hublify-msg-body-txt>
If present, this tag will be extracted from the finally rendered html-twig-result and usually used as the email's actual Content (Plain Text).
<hublify-msg-attachment>
If present, this tag represents one attached file. See detailed description below.
<hublify-msg-channel>
Optional tag to let the template decide through which email-channel (aka adaptor / connector) the final email will be sent.
Attachments
If present, this <hublify-msg-attachment> tag(s) will be extracted from the finally rendered html-twig-result and usually used as the email's File Attachment(s).
Hublify easily enables you to append attachments by following use-cases:
- This tag can occur multiple times for more than only one attachment.
- Attach static MAM-Assets /-files (pdf, xdoc, jpg, png, ...)
- Attach dynamic (text,csv,...) files, rendered at runtime of the main email,
- Attach dynamic rendered H-CMS-Templates (pdf, html, ....).
Typically Invoice-PDFs, etc. - PDF Merging: Multiple single PDF files can be merged into one or more aggregated PDF files.
This can be applied and mixed with dynamically rendered PDF-files and MAM asset files. - ZIP Archives: Multiple single attachments can be aggregated into one or more dynamically created zip-archives.
This can be used for dynamically rendered files and MAM asset files.
ZIP archives can be encrypted with passwords.
Syntax / Structure
Hublify expects one JSON-object per each <hublify-msg-attachment> tag. The generic structure is as follows.
<hublify-msg-attachment>
  {
    mb_label: "<asset-label>",   // Use this, if you want to attach a MAM-asset.
                                 //    or
    content: "<string>",         // Use this, if you want to attach text-based content as a file.
                                 //     or
    template: { ... },           // Use this (with more parameters), to render a dynamic (PDF-) file with H-CMS.


    name: "<filename>",          // (optional) Under this name the file is attached to the email.
                                 // E.g. "invoice - R000123.pdf".


    merge_filename: "<filename>",// (optional) If given then the file is merged into this file.
                                 // All the attachments that have here the same merge-file set are merged together.
                                 // Currently supported: "pdf"-files. E.g. "my-merged-file.pdf".

    zip_filename: "<filename>",  // (optional) If given then the attachment is added to this dynamically
                                 // created zip archive. The zip archive itself is then attached under this name.

    zip_password: "<password>",  // (optional) If given then the zip archive is encrypted and secured with
                                 // this password. E.g. "my-attached-archive.zip".

  }
</hublify-msg-attachment>
Example 1: Static Content-File
The content of the attached file is built at render-runtime of the main email! :)
{% set attachmentList = {
        'content': 'My simple text file.',
        'name': 'myAttach.txt'
     } %}

<hublify-msg-attachment>
   {{ attachmentList|json_encode() }}
</hublify-msg-attachment>
Example 2: Dynamic Rendered PDF (H-CMS)
The filed content (PDF) is rendered by a H-CMS-Template.
trgType
{% set attchPdfDoc = {
            template: {
                id: "tpl-c5ac86d3-6636-11eb-88ee-0242c0a83003",
                trgType: "pdf",     // (optional, default NULL) "html|txt|pdf|png"
                params: {
                    filter: {
                        inv_id: data.inv_id
                    }
                }
            },
            name: data.dataName~'-'~data.inv_code~'.pdf'
        } %}

<hublify-msg-attachment>{{ attchPdfDoc|json_encode() }}</hublify-msg-attachment>
"trgType":
- "html"
Uses then H-CMS-render(...). - "txt"
Uses then H-CMS-render(...). - "pdf"
Uses then H-CMS-document_generate(...). - "png"
Uses then H-CMS-document_generate(...).
Example 3: Dynamic ZIP Archive attached
It's very easy to create and attach zip archives on-the-fly. Simply add the zip_filename property with your desired final zip archive's filename.
Optionally you can add a zip password protection by providing the zip_password property with you password.
You only need to provide the password once with the corresponding zip_filename. In case of multiple and differently set zip_password, the last one wins.
In the following example there are two files added to one zip-archive.
{# -- First file, added to zip. Setting zip password #}
{% set attchMAM = {
       "mb_label": 'my-image-in-the-mam-label',
       "zip_filename": "my-dyn-zip-archive.zip",
       "zip_password": "ItsASecret!",
} %}
<hublify-msg-attachment>{{ attchMAM|json_encode() }}</hublify-msg-attachment>

{# -- Second file, content from a static string, added to zip #}
{% set attchStaticDoc = {
       "content": 'The quick brown fox jumps over the lazy dog!  :)',
       "name": "i-am-a-text.txt",
       "zip_filename": "my-dyn-zip-archive.zip",
} %}
<hublify-msg-attachment>{{ attchStaticDoc|json_encode() }}</hublify-msg-attachment>
Layouts
Every email is an HTML or Twig template. However, unlike web frontends, emails require a different structure in order to be compatible with as many email clients as possible and to enable a consistent display, so Hublify offers ready-made layouts that greatly simplify the creation of emails.
The layouts provide the HTML and CSS framework for your emails.
Recipient groups
E-mails sent by Hublify are always addressed to one of the following recipient groups.
- System E-Mails: Sent to the owner / operator / users of the Hublify-instance.
- Customer E-Mails: Sent to your own customers / clients.
- Partner E-Mails: Sent to your partners (like Merchants).
Hublify offers ready-made layout templates for every recipient group, which you can use to quickly and easily expand your email templates.
Layout templates for system e-mails:
@ecs/hublify/message/layouts/email--hublify--system.html.twig
@ecs/hublify/message/layouts/email--hublify-smgt-contentblocks--system.html.twig
Layout templates for customer e-mails:
@ecs/hublify/message/layouts/email--hublify--person.html.twig
@ecs/hublify/message/layouts/email--hublify-smgt-contentblocks--person.html.twig
Layout templates für partner e-mails:
@ecs/hublify/message/layouts/email--hublify--person.html.twig
@ecs/hublify/message/layouts/email--hublify-smgt-contentblocks--person.html.twig
Insight layouts
The ready-made layouts from Hublify provide a ready-made HTML and CSS framework for your emails. Below is a very abstract and commented code of such a layout.
{# --- Load theme based styling for person e-mail for inline styling --- #}

{% set styleMgrTheme = 'hfy-email-person' %}

{# --- Inject typical e-mail configurations (to, cc, bcc, ...) --- #}

<hublify-msg-email-to>{% block hublify_msg_to %}{% endblock %}</hublify-msg-email-to>
<hublify-msg-title>{% block hublify_msg_subject %}{% endblock%}</hublify-msg-title>
...

{# --- Create e-mail html body --- #}

<hublify-msg-body-html>

    <!DOCTYPE html>
    <html lang="en" ...>
    <head>
        {# --- Meta and title tags --- #}

        {# --- Included css style --- #}
        <style>...</style>
    </head>

    <body>
        <center>
            <div>
                {% block hublify_msg_preview %}{% endblock%}
            </div>

            <table>
                <tr>
                    <td>

                        {# --- Inject header, main and footer content --- #}

                        {% block content_header %}{% endblock %}
                        {% block content_main %}{% endblock %}
                        {% block content_footer %}{% endblock %}

                    </td>
                </tr>
            </table>
        </center>

    </body>
    </html>

</hublify-msg-body-html>

{# --- Optional e-mail txt body --- #}
<hublify-msg-body-txt>{% block hublify_msg_body_txt %}{% endblock %}</hublify-msg-body-txt>

{# --- Optional attachments --- #}
{% block hublify_msg_attachments %}{% endblock %}
How to use
Create a new Hublify-CMS's template-file. This template-file will hold the html source-code that will later get converted to the final PDF.
You can do this either via ...
- The Hublify App directly (CMS > Template > new)
- SFTP by creating a template file in your desired directory.
(Do not forget then to let Hublify re-index the template-files of this namespace!)
If you create an email template, you can simply extend it with one of the ready-made layout templates. For example, your email template could look like this (abstract representation):
{# --- Extend your e-mail template with a prepared layout template --- #}
{% extends '@ecs/hublify/message/layouts/email--hublify--person.html.twig' %}

{% block hublify_msg_to %}example@email.com{% endblock %}
{% block hublify_msg_subject %}Your e-mail subject{% endblock %}

{% block content_header %}
   Header of your e-mail.
{% endblock %}

{% block content_main %}
   Main content of your e-mail.
{% endblock %}

{% block content_footer %}
   Footer of your e-mail.
{% endblock %}
This will create a HTML e-mail based on a prepared layout with header, some content and footer.
Message templates
Create a new Twig template and add it to the index of your namespace. A "Message Template" must be created in Hublify so that your new Twig template can be used for sending emails.
To do this, go to the "System > Message Templates" area, create a new template and enter:
- Typ: "Email"
- Context: "<your dataset-label / model>"
After you have filled in all mandatory fields, you must select your Twig template from the "Hublify Template" dropdown in the "Message Configuration" area.
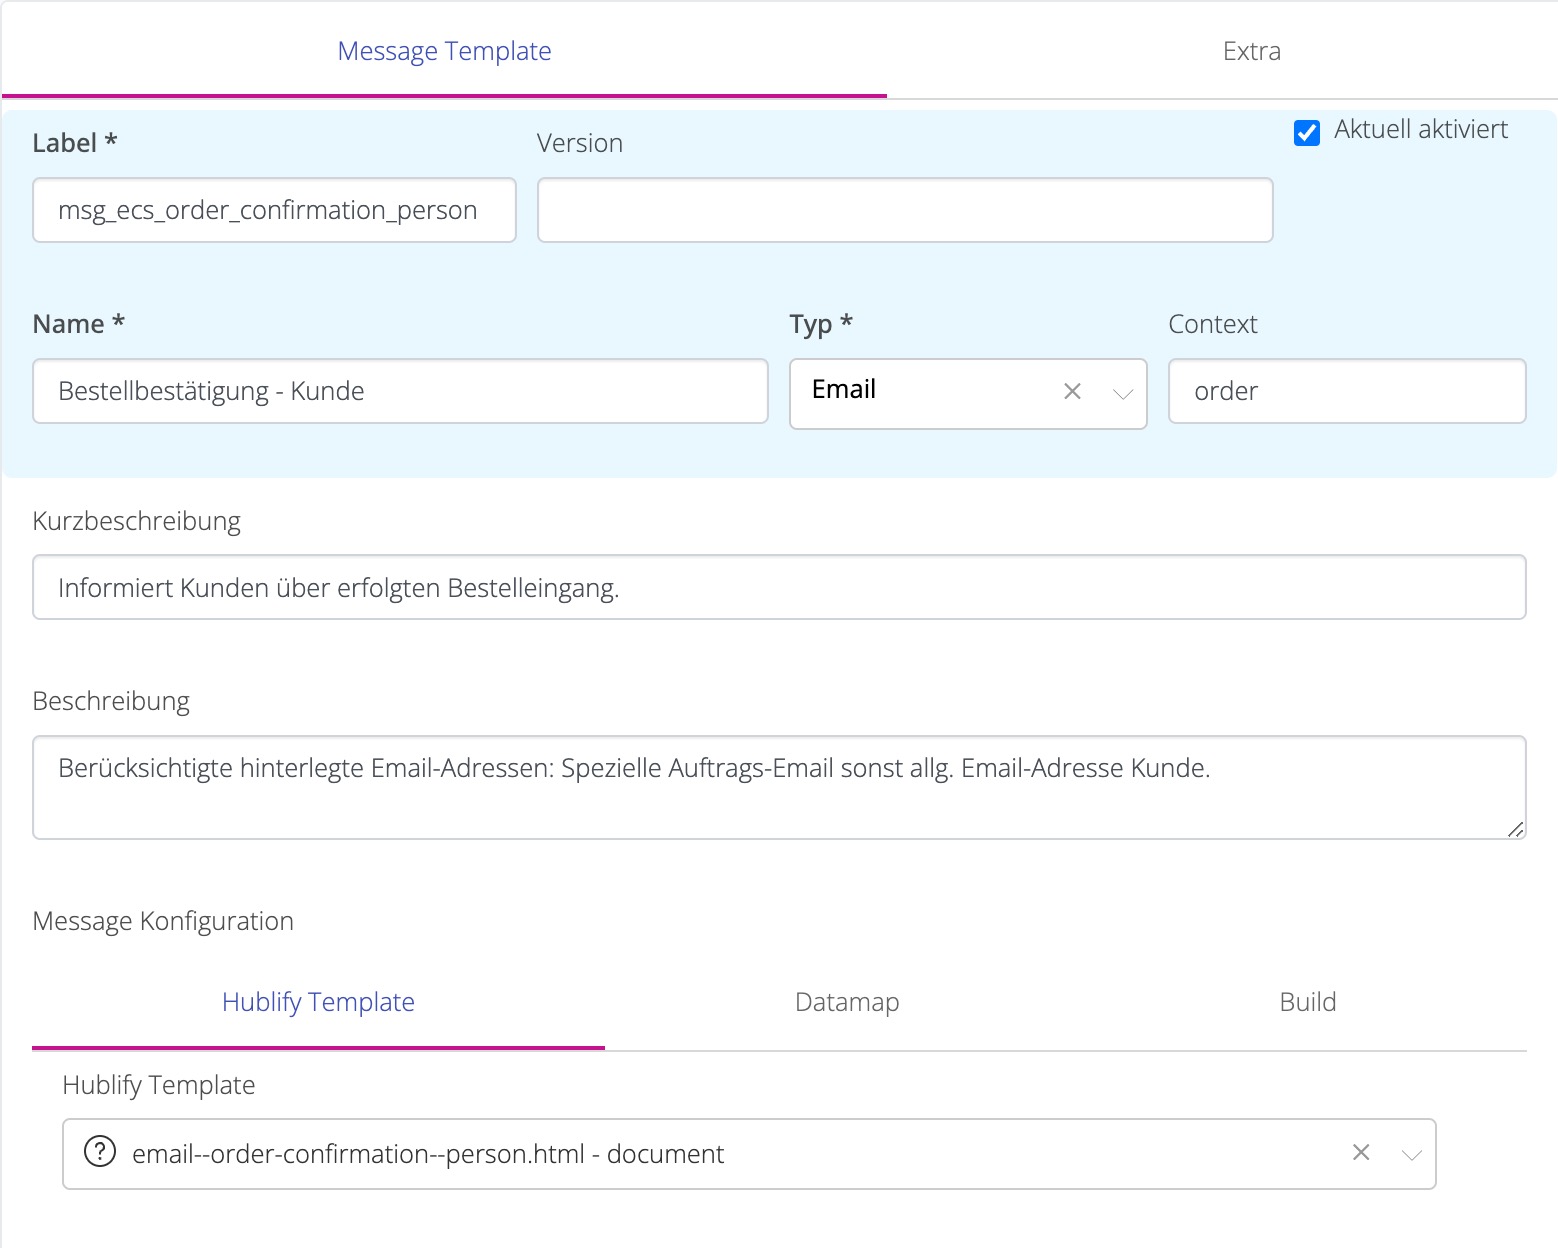
Now, a new message template exists, which uses your Twig template to generate the email.
More about Message Templates.
Sending e-mail
When you send an email from the Hublify app, a pop-up form opens in which you can enter further individual details for sending the email. For example, the recipients (To, CC, BCC) can be specified here.
You can freely configure which fields this form provides. This is also done in the "Message templates". See the "Send message form" section.
A typical form looks like this.
{
    "form": {
        "fieldDefinition": {
            "to": {
                "type": "hfyemail",
                "group": "base"
            },
            "cc": {
                "type": "hfyemail",
                "group": "base"
            },
            "bcc": {
                "type": "hfyemail",
                "group": "base"
            },
            "from": {
                "type": "hfyemail",
                "group": "base"
            },
            "replyto": {
                "type": "hfyemail",
                "group": "base"
            },
            "subject": {
                "type": "text",
                "group": "base"
            }
        },
        "layoutSettings": {
            "tabs": [
                {
                    "label": "base",
                    "cssLayoutGroupDefault": "col-12",
                    "groups": [
                        {
                            "label": "base",
                            "fdLabelLayoutDefault": "hz"
                        }
                    ]
                }
            ]
        }
    }
}
Using Contentblocks
In addition to web frontends and documents (PDFs), the content of emails can also be created with content blocks. The following settings must be taken into account for this, which we explain in more detail below.
- A form definition with content block fields is required in the settings of the indexed template.
- The content block fields must be loaded and rendered in the Twig template.
Template configuration
A form definition with content block fields is required in the settings of your indexed Twig template. To do this, open your indexed template in the Hublify app and add the desired form definition in the "Classification" area.
This could look as follows, for example.
{
    "form": {
        "fieldDefinition": {
            "content_blocks_header": {
                "type": "hfycontentblocks",
                "group": "base"
            },
            "content_blocks_main": {
                "type": "hfycontentblocks",
                "group": "base"
            },
            "content_blocks_footer": {
                "type": "hfycontentblocks",
                "group": "base"
            }
        },
        "layoutSettings": {
            "tabs": [
                {
                    "label": "base",
                    "cssLayoutGroupDefault": "col-12",
                    "groups": [
                        {
                            "label": "base",
                            "fdLabelLayoutDefault": "hz"
                        }
                    ]
                }
            ]
        }
    }
}
Three content block fields are now available in the message template. One for the header, one for the main content and one for the footer. You can now create the content of your email with any content blocks.
Twig template modifications
In your Twig template, you now need to access the previously defined fields and render the content blocks. To do this, we can add the following code to the Twig template already shown.
{# --- Extend your e-mail template with a prepared layout template --- #}
{% extends '@ecs/hublify/message/layouts/email--hublify--person.html.twig' %}

{% block hublify_msg_to %}example@email.com{% endblock %}
{% block hublify_msg_subject %}Your e-mail subject{% endblock %}

{% block content_header %}
   {# --- Render contentblocks --- #}
   {{ hublify.contentblocks(tpl_dynparams.content_blocks_header.data).setData(data).render() }}
{% endblock %}

{% block content_main %}
   {# --- Render contentblocks --- #}
   {{ hublify.contentblocks(tpl_dynparams.content_blocks_main.data).setData(data).render() }}
{% endblock %}

{% block content_footer %}
   {# --- Render contentblocks --- #}
   {{ hublify.contentblocks(tpl_dynparams.content_blocks_footer.data).setData(data).render() }}
{% endblock %}
Instead of simple HTML code, the content blocks of the various areas are now rendered.
More details about the function hublify.contentblocks().
Inline Styling
It is common to use so-called "inline styling" in emails, as generally defined CSS is not interpreted as expected by every email client. The following code should therefore be avoided.
<style>
    p { color: green }
</style>

<p>Green text</p>
The following code is more likely to lead to an expected display.
<p style="color: green">Green text</p>
Hublify offers many helpful functions for this situation. CSS - inline